Grill Out and Chill Out

This post was made possible by Longhorn Steakhouse. Thank you for supporting our sponsors! Happy June! 'Tis the season for summertime grilling galore. Though I will miss my weekend habit of schmoozing at Tennessee Brewery: The Revival beer garden during the months of April and May, I am pledging to move past my fear of the grill and prepare some memorable summer dinners.

IMG_6400


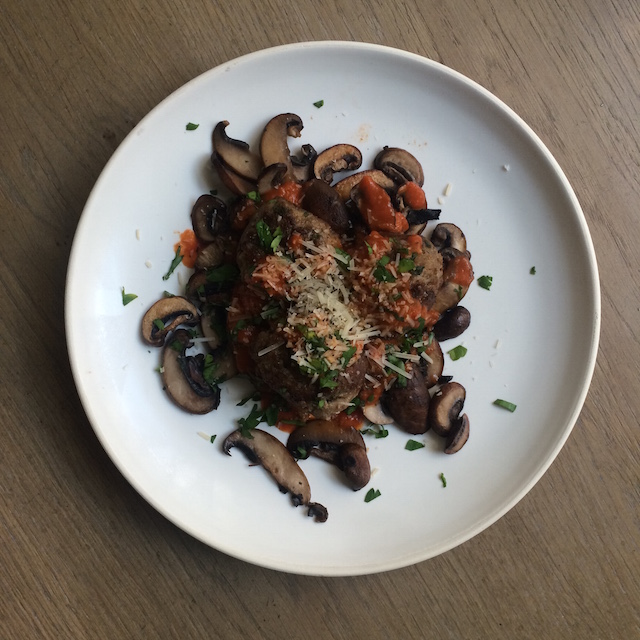
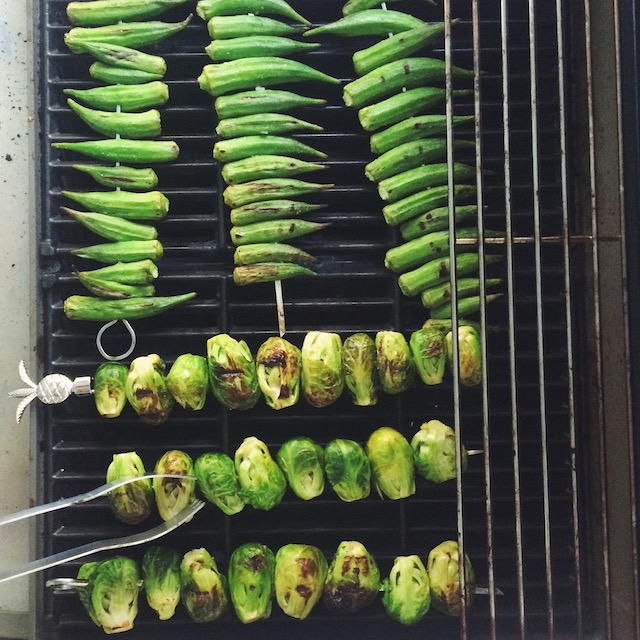
I personally do not own a grill but am lucky to share a rooftop community grill for my Downtown apartment building. It's fantstic to call "dibs" and gather friends for a sunset gathering. Last weekend on Memorial Day, upon receiving some swanky grilling goodies and tips from Longhorn Steakhouse, I planned a beautiful, doable meal of grilled shrimp skewers, filet, okra and brussels sprouts. You've got to try it!

Processed with VSCOcam with f2 preset

Follow along for some tips to entitle yourself an official "grillmaster" in no time...

1. Prep your surface. Your grill should be hot (about 500 degrees) and cleaned with a wire brush. Place your hand three inches above the grates, and count to three. If you need to pull your hand away before you hit “three,” it’s ready.

2. Prevent sticking. Before you put anything on your grill, rub the grates with an old wash cloth dipped in a small amount of oil. Use your tongs to handle the washcloth so that you don’t risk burning your hand.

3. Get in the zone. If you’re working with a large gas grill, create cooking “zones” by keeping one section at a lower temperature. As your meat and vegetables start to cook through, you can move them to a cooler area to slow down the process.

4. Tools of the trade. Keep everything you need within reach: metal spatula, heavy duty metal tongs, a good grill brush and a small squirt bottle (used to douse any flare-ups).

5. Select fresh proteins and vegetables. If you’re planning to serve steak, filets, sirloins and ribeyes are best on the grill – just be sure they’re fresh, never frozen.

6. Boldly season. Don’t be shy when seasoning your steak! Go bold. For an at-home rub, try “The Big 4” – salt, pepper, granulated onion powder and granulated garlic powder.

7. Sear-in diamond marks. Searing locks in flavor, as well as creates those great grill marks synonymous with summer. Grill your steak for 2-3 minutes on one side, then give it a quarter turn. Flip and repeat.

8. Test for doneness. With a meat thermometer, steaks should be at minimum 120-130 degrees if you like it rare, and up to 170 degrees, if you prefer your steak well-done.

9. Handle with tongs. Only use tongs to touch your meat. Poking with a fork to rotate or pull it from the grill will let the juices and flavor out.

10. Give it a rest. Make sure you let your steaks and other proteins rest for 2-3 minutes before serving. This will allow the juices to settle back into the meat, resulting in optimal flavor.

Tips provided by Longhorn Steakhouse's executive chefs. Thank you for supporting our sponsors!

Spring Salad with Egg

IMG_5898.jpg

Good morning, ladies and gentlemen. I awoke with a Grizzlies hangover, if you will. Yesterday's late night loss has put me in a complicated funk, though this recipe is anything but. It's simple and delightful. In fact, I might make it again today.

Processed with VSCOcam with f2 preset

In my opinion, lunches like these kickstart a feeling of refreshment. I felt proud for not guiltily eating a loaf of bread while still feeling full and fabulous. It's proven that protein is a must...So, when in doubt (or in loss of chicken or fish in your refrigerator), put an egg on it. I think you'll enjoy this one. If you make a version of it, be sure to share!

Makes 1 serving

3 radishes, thinly sliced 1/2 cup shelled edamame, steamed 1/2 avocado, cubed 1/2 cup sugar snap peas, halved 1 egg Sea salt and pepper

1. Heat a small skillet over medium heat. Meanwhile, add prepped vegetables to a bowl.

2. Gently crack egg into pan. Allow whites to cook through, then flip. Top vegetables with soft poached egg. Sprinkle with sea salt and pepper.

3. Break yolk and mix ingredients. Serve immediately.

IMG_5893

Radish Goat Cheese Toasts

11165312_10204318942082846_9107809527983748684_n.jpg

As I reflect on a wonderful Kentucky Derby brunch from this past Saturday, I realize the comparable qualities to that of a perfect Mother's Day brunch for family this upcoming Sunday. The dishes translate flawlessly, from poached eggs on flaky biscuits to radish goat cheese toasts (see recipe below). If you have yet to make a restaurant reservation, do not fret! A homemade meal with your personal touch will please any mother...That's why I'm planning a spring frittata and Strano's freshly baked cinnamon rolls to-go for mine. How are you celebrating and gifting for Mother's Day?

11009090_10204318943162873_3176596410334274103_n 11200577_10204318942722862_1455839715880391189_n

1 loaf ciabatta, sliced 2 tablespoons olive oil 8 radishes, thinly sliced 1 4 ounce round of goat cheese, room temperature 1 tablespoon rosemary, finely chopped Maldon flaky sea salt, to taste

1. Heat 1 tablespoon olive oil over medium-high heat in cast iron skillet. Place 4-5 toast slices on skillet (or however many fit!). Leave for 2 minutes until golden brown. Flip. Remove toast and repeat until all slices are golden.

2. Spread each toast slice with a thin layer of goat cheese. Top with radish slices, a sprinkle of rosemary, sea salt, and black pepper.

Processed with VSCOcam with f2 preset

11203043_10204318943722887_5339736005166484190_n

11193349_10204318943522882_1559394978155981372_n

Vietnamese Spring Roll Party

image4-e1430136830473.jpg

image It all began in the pedicure chair. My friend (and pedicurist) Kathy and I were not discussing gossip or boyfriends, but rather the science behind perfect peanut sauce. I simply couldn't master it. Hoisin, peanut butter and sugar were all it took; yet the ratios were not in my favor during each kitchen trial.

Saturday morning, Kathy surprised me with a homemade batch of her peanut sauce, which, yes, was fantastic. I went to Fresh Market soon after for spring roll ingredients and invited a few friends over for the fun. Both the set-up and finished product were ideal for small gatherings. Spring rolls are creative, customizable, colorful, healthy...Need I say more?

image

What you'll need:

Rice paper Boiled shrimp, butterflied Thinly sliced sashimi tuna Lump crab meat Sliced avocado Sliced cucumber Basil leaves Carrots Udon or vermicelli noodles Peanut sauce, for dipping

1. Fill a casserole dish with warm water and place directly next to a large cutting board. Carefully add one rice paper round to the dish, pressing gently to soften the textured ridges.

2. Carefully remove rice paper from dish after 15 seconds. Begin with a small handful of noodles in the center of the rice paper round. Add 3 butterflied shrimp slices, 1 slice of tuna, and a tablespoon of crab. Then, layer cucumber, 2 avocado slices, and carrots. Customize as you wish!

3. Fold in right and left sides first, then roll tightly. Serve at room temperature (or chilled) with peanut sauce.

image image

Halibut with Edamame and Truffled Cauliflower Rice

Processed with VSCOcam with f2 preset I have been craving a clean, bright plate since Spring officially commenced. And, of course, the halibut was looking fine as ever at The Fresh Market. I innocently experimented with broiler and the food processor Monday evening during a unusually calming thunderstorm; no cookbook, no ripped pages of Bon Appetît. All trial and (a little bit of) error. I taught myself how to properly broil fish and reminded myself to let the simple flavors shine. No need for cream or butter or excessive spices. Just as Anna Watson Carl preaches: It's about celebrating the natural, authentic flavors of fresh ingredients.

According to my calculations, this gluten-free recipe is only 400 calories yet 54 grams of protein! The dish results in a satisfying stomach and a beautiful color palette for the spring season.

P.S. I've heard that the cauliflower rice is a fantastic substitute in homemade fried rice. Simply stir in some scrambled egg, soy, sesame oil, and veggies. I am trying it as soon as possible, so I'll be sure to share photos and thoughts.

Makes 1 serving

1 6-ounce filet of halibut, skin removed 1 teaspoon olive oil Porcellino's Lil Ray seasoning (salt, thyme, lemon zest, sugar) 1/2 cup frozen shelled edamame, shelled 1/2 cup spinach 1 cup cauliflower 1 teaspoon truffle oil Salt and pepper, to taste

1. Preheat broiler on high for 7-10 minutes. Brush both sides of halibut with olive oil and place on foiled baking sheet. Sprinkle with seasoning.

2. Meanwhile, microwave cauliflower in microwave-safe bowl for 2 minutes until steamed. Set aside to slightly cool.

3. Heat small saucepan on medium heat. Place fish in oven, keeping a close eye on the filet. Cook for 6-8 minutes, or until cooked through.

4. Sauté edamame and spinach in small saucepan until wilted, about 3-4 minutes. Add salt and pepper as needed.

5. While edamame and spinach are cooking, place cauliflower in a food processor. Pulse until consistency is a fine rice shape. Transfer cauliflower to serving plate. Drizzle with truffle oil.

6. Top cauliflower with edamame/spinach, then filet. Serve immediately.

Meatballs with Mushrooms

Processed with VSCOcam with f2 preset

Sundays are dubbed "Italian night" in my kitchen, and I've been pushing myself to expand my cooking expertise beyond seafood. Last night, I created a flavorful, light-as-air meatball that stands alone so beautifully, pasta is not even required. The woodsy baby bella mushrooms add another note of dark, rich hues without adding extra carbs. Next time, I'll add slivers of fresh garlic to the tomato sauce before plating on my Paper & Clay piece. Enjoy your Monday (with meatballs, perhaps)!

Makes 2 servings

1/2 pound ground lean beef 1 egg 1/4 cup Italian bread crumbs 1/8 cup grated parmesan 1 tablespoon finely chopped parsley, plus extra for garnish Salt and pepper 1 tablespoon canola oil 1 tablespoon butter 8 baby bella mushrooms, sliced 1/4 cup tomato sauce

1. In a small bowl, place meat, egg, bread crumbs, parmesan, parsley, salt and pepper. Use your hands to combine ingredients. Create six 2-inch diameter meatballs.

2. In a small cast-iron skillet, heat canola oil over medium-high heat. Add meatballs, one by one, and sear for 2-3 minutes until bottoms are gold brown. Flip and repeat. Turn down heat to medium and continue to sear until cooked-through, approximately 10 minutes. Keep warm on low heat.

3. Meanwhile, heat butter in a small saucepan on medium heat. Add mushrooms and caramelize for 8-10 minutes, stirring occasionally.

4. Once mushrooms are cooked, divide onto two dinner plates. Return saucepan to stove and add tomato sauce, heating on medium heat until hot. Add three meatballs to each plate. Top with tomato sauce, parmesan cheese, and parsley. Serve immediately.

IMG_4778